Have you ever wondered how to set up the ClickBank Postback? If the answer is yes, you’re not alone! Continue reading to find the answer to this question, and learn how to set up your ClickBank Postback properly so your tracking is good and you never miss a commission!
Usually, the first question we hear asked is “How to make money with ClickBank“? Not so fast! Before you start making any sales, you need to set up ClickBank Postback tracking so that you can easily track where your conversions are coming from.
ClickBank Postbacks allow affiliates to see which affiliate links have been clicked on by their visitors in order for them to convert into sales. This allows you to know exactly what traffic has converted before they even leave your site. It also gives you an idea of whether or not there’s something wrong with your link because if people click through but don’t buy then maybe your product isn’t as great as you thought it was.
There are a lot of solid offers in Clickbank that are whitehat and can be promoted on various traffic sources without any issues.
The issue is that many trackers are not compatible with ClickBank’s tracking and the conversions need to be exported then imported into your tracker to be able to track anything properly. In case you missed it, we did a video that shows you exactly how to set up your ClickBank Postback. Click the video below to learn more about the ClickBank Postback.
Setting up tracking between different platforms can be a HUGE pain and very time-consuming when it comes to affiliate marketing tracking.
The first and best thing to do is get Bemob or some other affiliate tracker that easily integrates with the ClickBank Postback feature. You can control the funnel to optimize your traffic even further, but we’re not going to focus on that in this article. For now, we want to get it working with any tracker, even CPV LAB PRO. A lot of affiliates are not aware of this but you can call the ClickBank Postback anytime you have a sale!
The main problem is the ClickBank Postback cannot be configured and sent to all tracking systems the way you would like it to send. It’s pretty much useless on some platforms. That being said with one little script we can configure it and make it work with any tracking system out there!
How to Setup ClickBank Postback With a Platform That Does NOT Integrate
You will need a few things before we get started.
- Clickbank account
- The postback URL from your tracker
- The script (down below)
- An SSL certificate (because clickbank will not send anything to a non secure URL)
Login to your ClickBank account and click on my site at the top.

Scroll down until you see integrated sales reporting

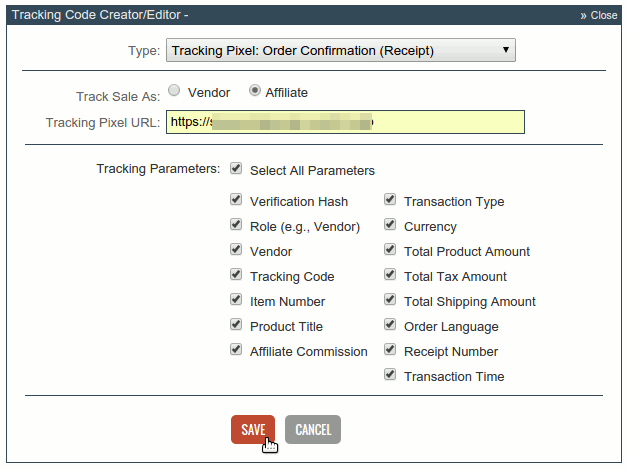
Click “add tracking code” button. In the type box select “Tracking Pixel Order Confirmation (Receipt). For the track as select the affiliate option.
The URL you are going to enter is where ever you decide to upload the script below too. (example: http://powerhouseaffiliate.com/script.php). The file needs to be in php format, remember this.
Everything should be like the picture below.
Click on “Save” and you will be directed to a page like the one shown below.
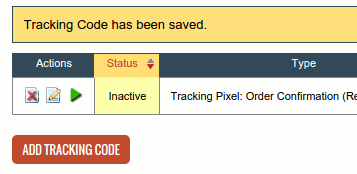
As you can see the tracking pixel is inactive. We can activate this later once we have set up the script. Create a file called script.php and copy the following code into that file.
<?php
// This script only reports initial sales and upsells.
// If you were using Funnel Flux instead, then rebills and refunds
// would also be tracked automatically as Funnel Flux is fully integrated with Clickbank.
//
// Instructions: You will edit the 4 parameters defined
// in the "SETTINGS TO EDIT" section below.
//
// 1/ Replace the value of $postbackURL by the postback URL given to you by
// your tracker BUT in that URL keep only the part that is before the ?
//
// 2/ Replace the value of $cidParameterName by the name of the click-id
// parameter (example: "cid" for Voluum)
//
// 3/ Replace the value of $payoutParameterName by the name of the parameter
// that allows you to track your commissions for a conversion (example: "payout" for Voluum)
//
// 4/ Replace the value of $transactionParameterName by the name of the parameter
// that allows you to track upsells (example: "txid" for Voluum)
//
// Only $postbackURL and $cidParameterName are mandatory.
// If you do not want or can't fill in the other two, then make them empty like this:
// $payoutParameterName = ""
// $transactionParameterName = ""
//-----------------------------------------------------
// SETTINGS TO EDIT
//-----------------------------------------------------
$postbackURL = "http://xxxxx.trackvoluum.com/postback?cid=REPLACE&payout=OPTIONAL&txid=OPTIONAL";
$cidParameterName = "cid";
$payoutParameterName = "payout";
$transactionParameterName = "txid";
//-----------------------------------------------------
//-----------------------------------------------------
// DO NOT TOUCH ANYTHING BELOW
//-----------------------------------------------------
$tid = filter_input(INPUT_GET, "trackingCodes");
$payout = filter_input(INPUT_GET, "affiliateCommission");
$txid = filter_input(INPUT_GET, "receipt");
$aParams = array();
if( $tid !== null && !empty($cidParameterName) )
$aParams[$cidParameterName] = $tid;
if( $payout !== null && !empty($payoutParameterName) )
$aParams[$payoutParameterName] = $payout;
if( $txid !== null && !empty($transactionParameterName) )
$aParams[$transactionParameterName] = $txid;
$aParts = explode("?", trim($postbackURL));
$finalPostbackURL = $aParts[0]."?".http_build_query($aParams);
if( $finalPostbackURL )
{
$ch = curl_init($finalPostbackURL);
curl_setopt($ch, CURLOPT_RETURNTRANSFER, true);
curl_setopt($ch, CURLOPT_HEADER, false);
curl_setopt($ch, CURLOPT_SSL_VERIFYPEER, false);
curl_setopt($ch, CURLOPT_FOLLOWLOCATION, true);
curl_exec($ch);
curl_close($ch);
}
Then you will have to edit a few things in the Settings to Edit.
The first thing you will change is the $postbackURL. You will get the postback URL from your tracker and paste it in its place between the quotes.
If you are using another tracker you will need to change 3 more parts.
The line $cidParameterName = “cid”; Replace “cid” with the name of your postback click id parameter. You will need to refer to your tracking guide documentation for this.
The line:
$payoutParameterName = “payout”;
Replace “payout” with the name of your postback payout parameter. Again you may need to consult your documentation for your tracker.
The Line $transactionParameterName = “txid”; Replace “txid” with the name of your postback transaction id parameter -This helps you to track upsells if there are any. Please refer to your tracking documentation for more information.
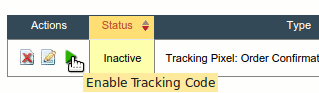
Once this has been completed simply go back to ClickBank and activate your tracking pixel and you are done!
Final Thoughts
In conclusion, I hope this tutorial helped you understand what exactly happens behind the scenes when setting up a ClickBank Postback. Tracking your commissions is essential to making money online as an affiliate marketer.
I am always looking forward to hearing feedback or questions regarding this topic. Feel free to leave them in the comments section below.
If you want to level up your affiliate marketing and make even more money, join Powerhouse Affiliate and get instant access to the ultimate resource center. We have courses, case studies, templates and more to help you improve your campaigns and exceed your goals.
Join today!
I
Want. To join in
Hi just visit http://powerhouseaffiliate.com and you can join today!